

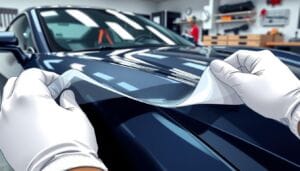
PPF removal is mostly heat and patience. The film is engineered to come off in sheets when warmed evenly, and most of the horror stories about peeling clear coat happen when an installer rushes the heat or pulls at the wrong angle.
We do PPF removal at our shop as part of new installs and as standalone jobs. The DIY route is possible if the film is in good condition, the paint underneath is healthy, and you have the time and the right tools. If any of those three are off, pay a shop.
Table of Contents
ToggleWhen you should remove PPF
A few honest reasons.
The film is past its useful life. Quality PPF lasts 10 years or more, but cheaper or older film can yellow, chalk, or stain after 5 to 7 years. Once the film starts to look worse than the paint underneath, it is time.
You took damage. A deep gouge, a panel hit, or torn film from an accident means that section needs replacement. Sometimes a single panel, sometimes the whole front end depending on what happened.
You are reselling and the buyer wants to see the paint. Some buyers want bare paint for their own PPF install. Removal lets the next owner start fresh.
You changed your mind about the look. Stealth (matte) PPF coming off to reveal the gloss underneath, or the other way around.
You are wrapping the car in vinyl. PPF goes under vinyl in some installs, but if the existing PPF is past its life, removing first and starting fresh is the cleaner answer.
What you need
The tools list is short.
The most important item on that list is patience. PPF removal that goes well takes 2 to 4 hours per panel, longer for hood and roof. Rushing the heat or pulling cold film is what damages paint.
Step 1: Inspect before you start
Look at the film and the paint underneath, panel by panel.
If the film is intact and the edges are sealed, the removal will be clean. Heat the corner, peel slowly, the film comes off in sheets, the adhesive stays on the film side mostly.
If the film is brittle, yellowed, or cracked, removal will be messy. Brittle film tears in small pieces. The adhesive stays on the paint instead of the film. Plan for more time and more adhesive remover.
If the paint underneath is original factory paint in good condition, removal is safe with proper technique. If the paint is a respray, especially a recent respray, the PPF removal can lift the respray with it. This is the single biggest risk in DIY removal and is the reason we ask about paint history before quoting a removal job.
Step 2: Heat the corner
Set the heat gun to low for the first pass. Hold it 6 to 8 inches off the panel and warm a corner of the film for 30 to 60 seconds.
The film should feel warm but not hot to the back of your hand. Too hot and you risk the paint or the clear coat. Too cool and the film will not release.
Use a plastic razor or your fingernail to lift a corner. The film should peel up with steady pressure. If it does not lift cleanly, give it more heat.
Step 3: Peel slowly at a low angle
Once you have a corner lifted, hold the film at as low an angle as possible (close to parallel with the panel) and pull steadily.
The low angle is the trick. Pulling straight up, perpendicular to the panel, increases the chance of pulling the clear coat with the film. Pulling parallel keeps the stress on the adhesive bond, not on the paint underneath.
Continue heating just ahead of where you are peeling. The heat gun follows your peeling hand. Both move at the same pace.
Take breaks. PPF removal is a slow, consistent process. Yanking the film fast is what causes problems. If the film is fighting you, stop, give it more heat, try again.
Step 4: Deal with the adhesive residue
Most removals leave some adhesive on the paint, sometimes a little, sometimes a lot. Sticky to the touch but not damaging.
Soak a microfibre with isopropyl alcohol or a citrus-based adhesive remover. Apply to the residue, let it sit for 30 seconds, wipe in straight lines. Repeat as needed.
Some panels come off cleanly with no residue. Others leave a haze of adhesive that needs multiple passes. Older films and films installed in heat leave more residue.
Avoid harsh solvents like acetone or lacquer thinner. They will strip clear coat. Stick with alcohol or a product labelled safe for automotive paint.
Step 5: Wash and inspect the paint
After all the adhesive is gone, wash the panel with car shampoo and dry it thoroughly.
Look at the paint under good light. You should see your original paint in the same condition it was in when the PPF went on. UV protection from PPF means the area under the film looks slightly darker or more saturated than surrounding paint that was exposed for years. This is normal and the colour evens out over a few months in the sun.
If you see clouding, etching, or pulled clear coat, the removal damaged the paint. This usually means the film was past its life, the adhesive bonded too hard, or the paint was a soft respray. Polish or paint correction can help with mild damage. Severe damage means a respray.
Common DIY mistakes
Three patterns we see when DIY removals come into the shop.
Pulling cold film. The number one mistake. Film must be warm to release without paint risk. Cold pulls leave clear coat marks or take chunks of paint off corners.
Using metal razors on the paint. Plastic only. A metal blade on a panel is one slip from a deep scratch.
Stopping mid-panel. Heat the panel, peel half, walk away, come back the next day. The half-peeled section now has the adhesive curing in the open. The peel back gets harder. Finish the panel once you start it.
When to bring it to the shop
A few cases where DIY is a bad call.
Resprayed paint. Especially recent respray (less than 6 months). The respray bond is not as strong as factory paint and PPF removal can lift it.
Old, brittle film. Film over 8 to 10 years on a daily-driven car often comes off in tiny pieces, leaves the adhesive on the paint, and turns into a many-hour job per panel.
Painted surfaces under suspicion. If you do not know whether the panel is factory paint or repainted, a shop will recognise the difference and adjust technique.
Whole-vehicle removal where you do not have the time. A full-car PPF removal is 2 to 4 days of focused work. Most owners do not have that much weekend.
What removal costs at a shop
PPF removal pricing depends on the panels, the film age, and the condition.
A removal followed by a fresh PPF install on the same day discounts the total because the panels are already prepped. We include removal in a new install quote rather than charging twice.
After removal: now what
Three options after the film is off.
Leave the paint exposed. Bare paint is fine if the car is going to a buyer who wants it that way, or if you are done with PPF.
Reinstall fresh PPF. Most common path. The panels are clean, the prep is fast, the new film goes on with full adhesive bond.
Switch to ceramic coating. A ceramic coating provides hydrophobic and chemical protection but no impact protection. Some owners go from PPF to ceramic after years of running PPF and deciding the impact protection is no longer worth the cost. Ceramic coating at our shop runs $800 to $2,000 depending on the package.
The right answer depends on how you drive and what you value. If you drive highways and want chip protection, fresh PPF is the right call. If you mostly garage-keep and the car does not see much road exposure, ceramic alone can be enough.
A note on warranties
Most PPF films come with a manufacturer warranty against yellowing and bubbling. Removal is covered if you are within the warranty window and the film failed before its expected life.
We can help process warranty claims for film we installed. For film installed by another shop, you go through the original installer or directly through the manufacturer.
We service Wylie, Plano, Frisco, Allen, Garland, Rockwall, Murphy, Sachse, and Lavon. Removal alone or removal-and-reinstall, either way send us photos of the existing film and the panels you want addressed and we will quote it real.
*This article was drafted with the help of AI and reviewed by the Shell Shocked Wraps team.*
